MFA & Commonwealth Password Reset
Registration Guide
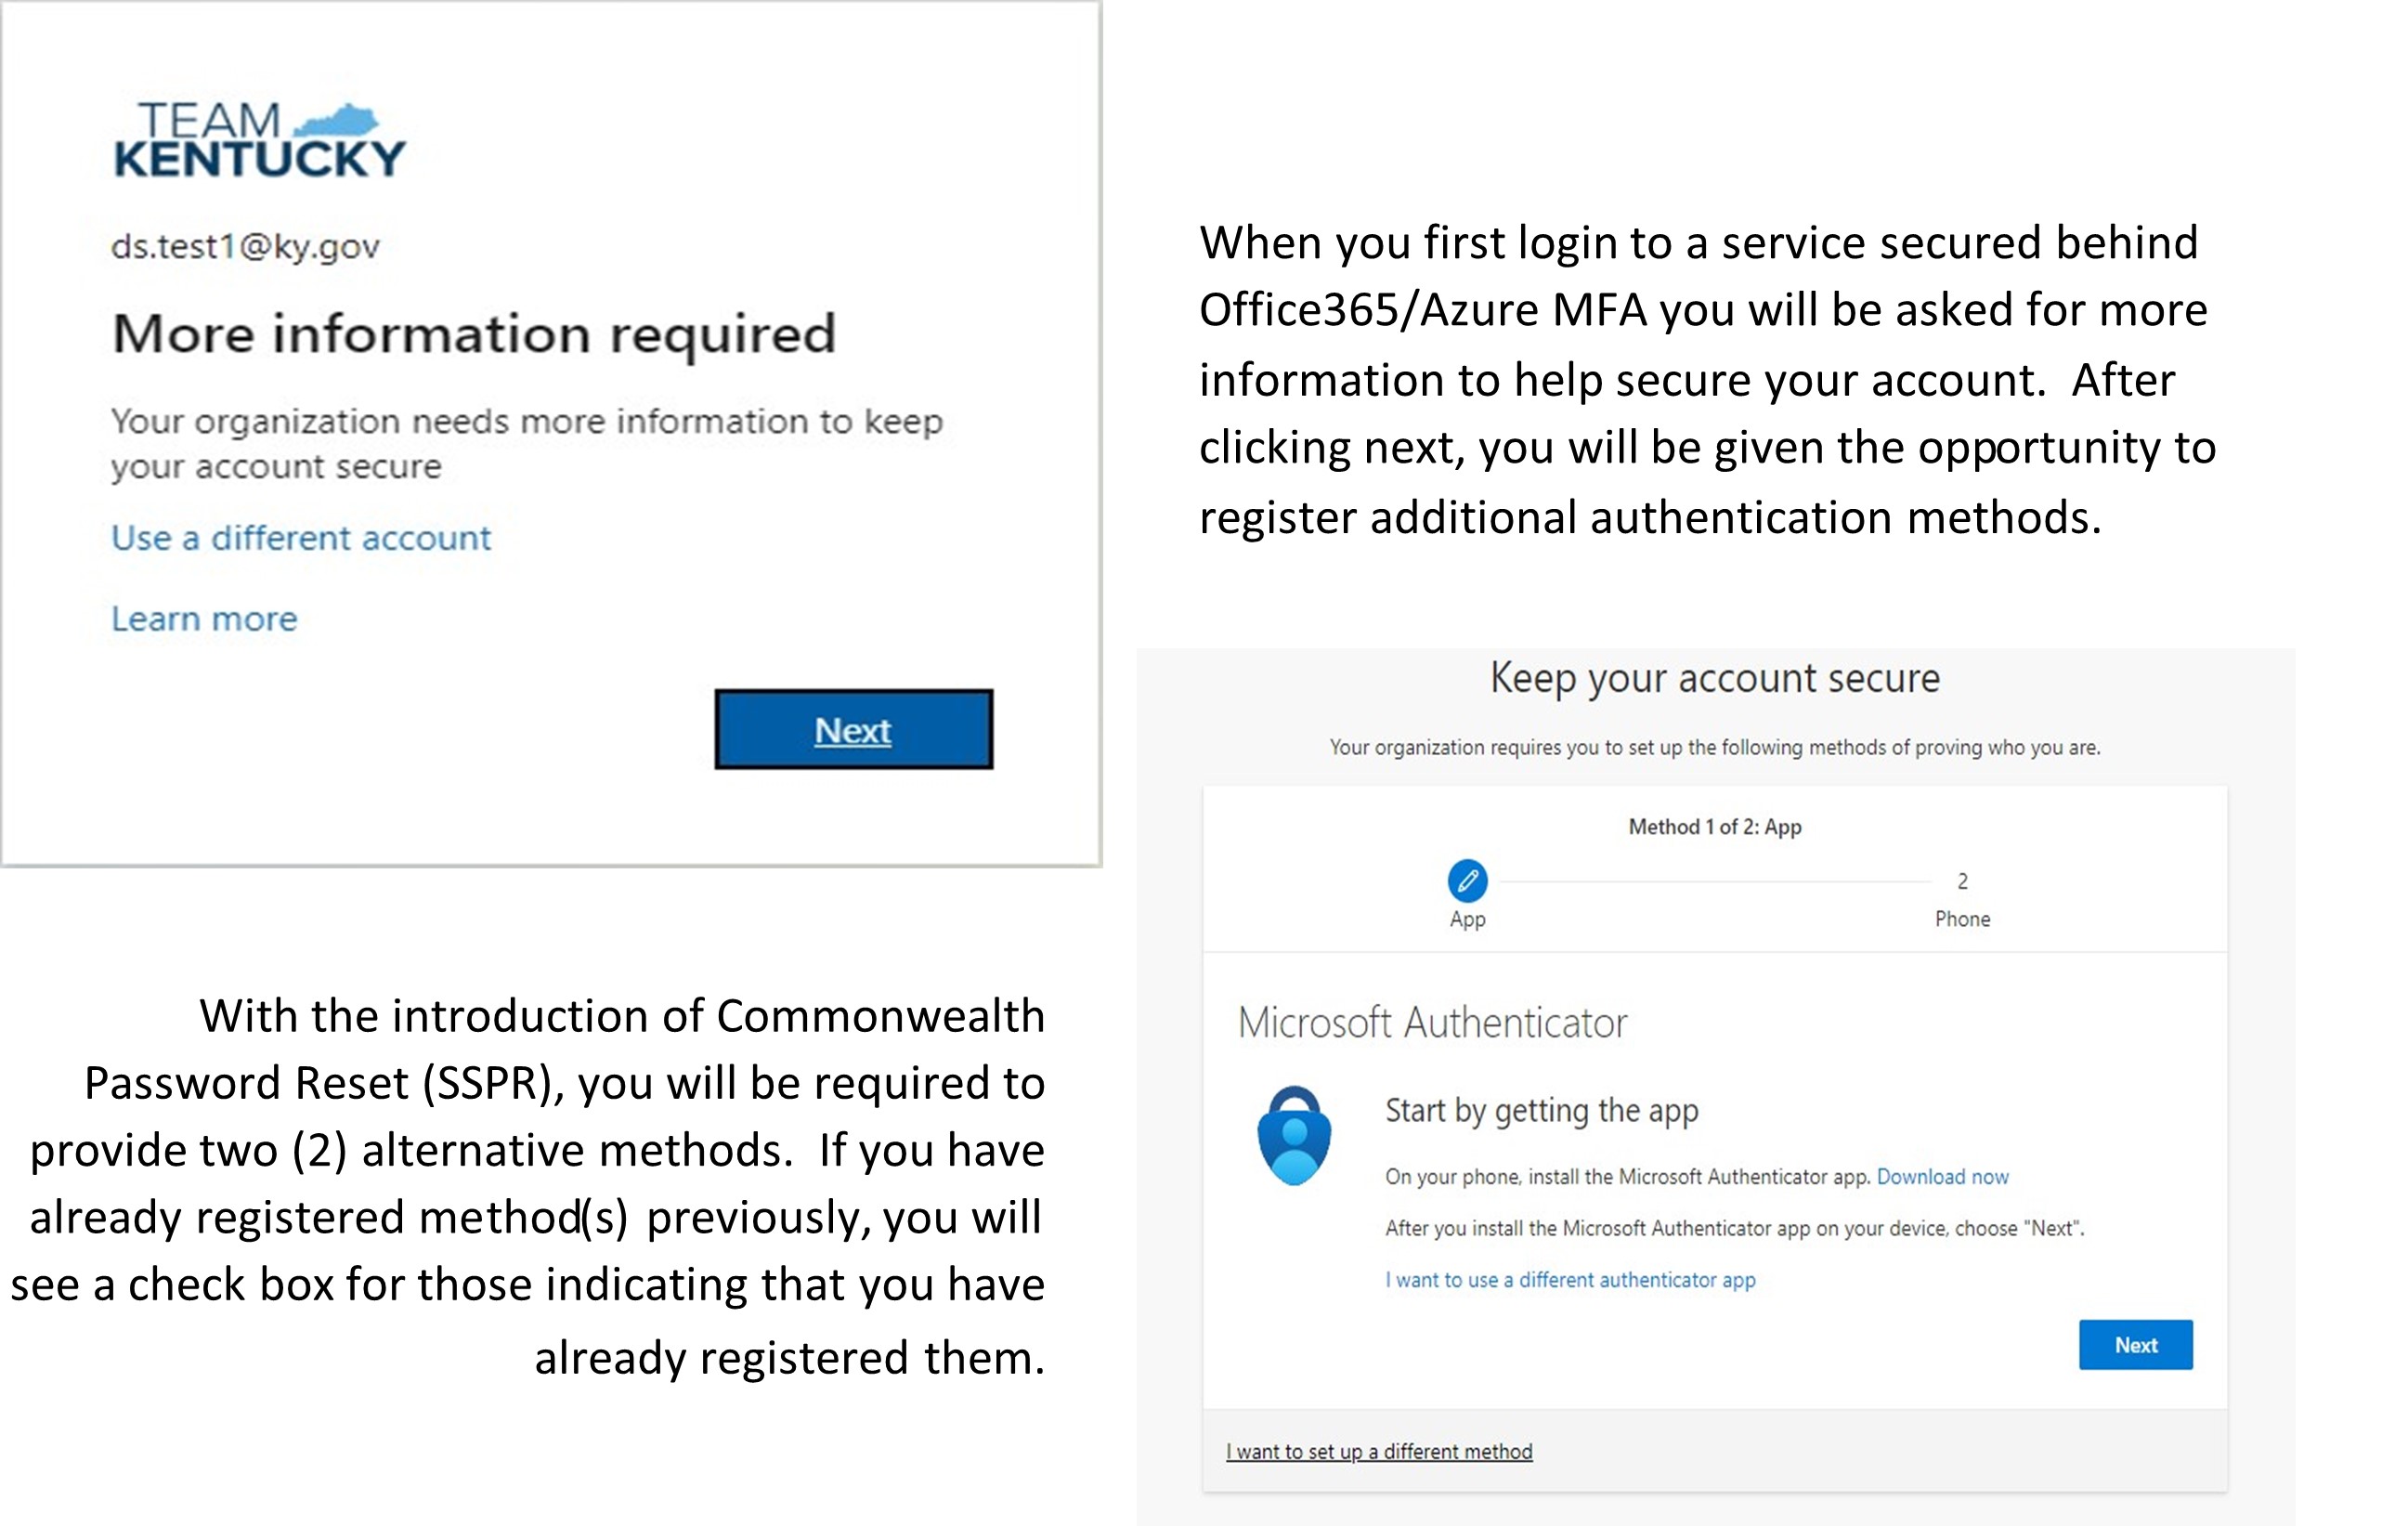
COT has implemented a new method for registering alternate authentication credentials for use with multifactor authentication (MFA) and a new Commonwealth Password Reset (SSPR) service. The guide below will demonstrate registration using the methods available.
The following alternate authentication credential methods can be used to register for both MFA and SSPR:
- Microsoft Authenticator App (Push notifications and one time code)
- Third-party authenticator app (such as Google Authenticator) (One time code only – See Appendix C)
- Mobile Phone (Phone call or text code)
- Office Phone (Phone call only)
- Security Questions (This is only available for SSPR and not MFA)
The methods above are listed in order of strength of security with number 1 offering the most secure protection and number 5 the least. When you are first prompted for the method to use, the choices available will always be presented in this order.
Method Registration Overview
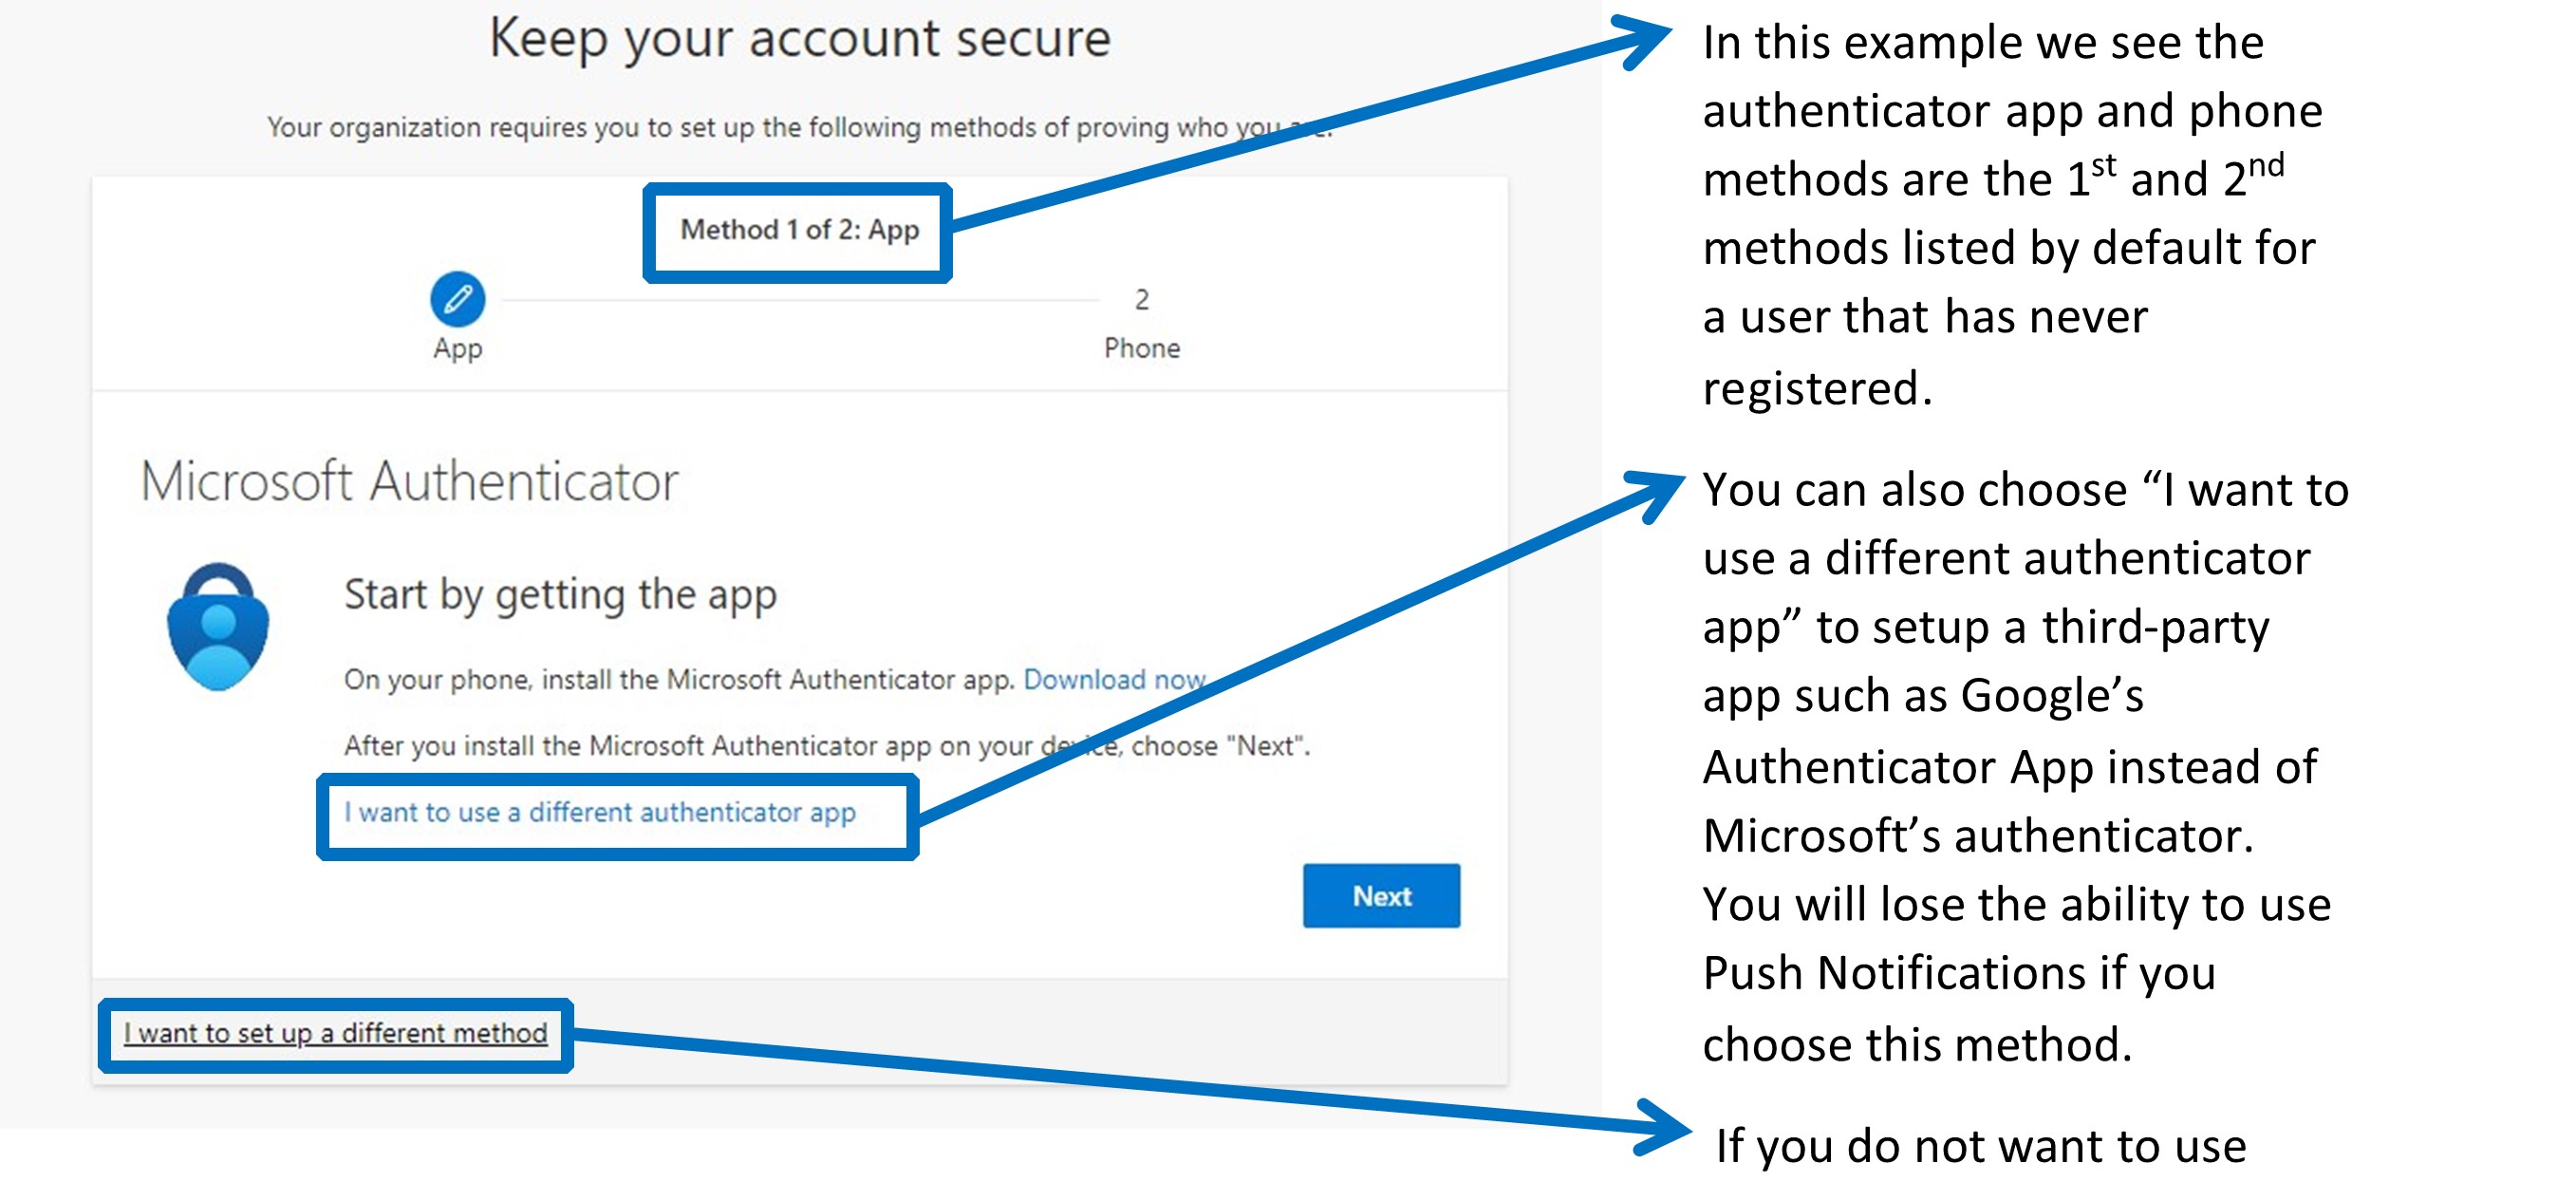
These methods, you may select “I want to set up a different method” in the bottom left corner and choose one of the other options available.
Microsoft Authenticator App
The next steps will walk you through setting up the Windows Authenticator App for both Android and IOS
If you have used Microsoft Teams, Outlook, or any other Office365 application from your mobile device, you may have already installed the Microsoft Authenticator application as well. This is because the Office365 applications can use it to share authentication using your current password.
However, it may not be setup as an MFA or SSPR option, and you will still need to perform the steps here to register it as an additional method for these purposes. If you already have the Microsoft Authenticator installed and want to extend its usage to include MFA and SSPR see Appendix D for additional instructions if needed.
***Important: During setup of the authenticator, you may be presented with a pop-up to enter a PIN, face ID, or other biometric unlock method for your phone. This should not be confused with the PIN used for MFA. You are simply “unlocking” your phone as a security feature to protect the application from others.
Microsoft Authenticator – Android
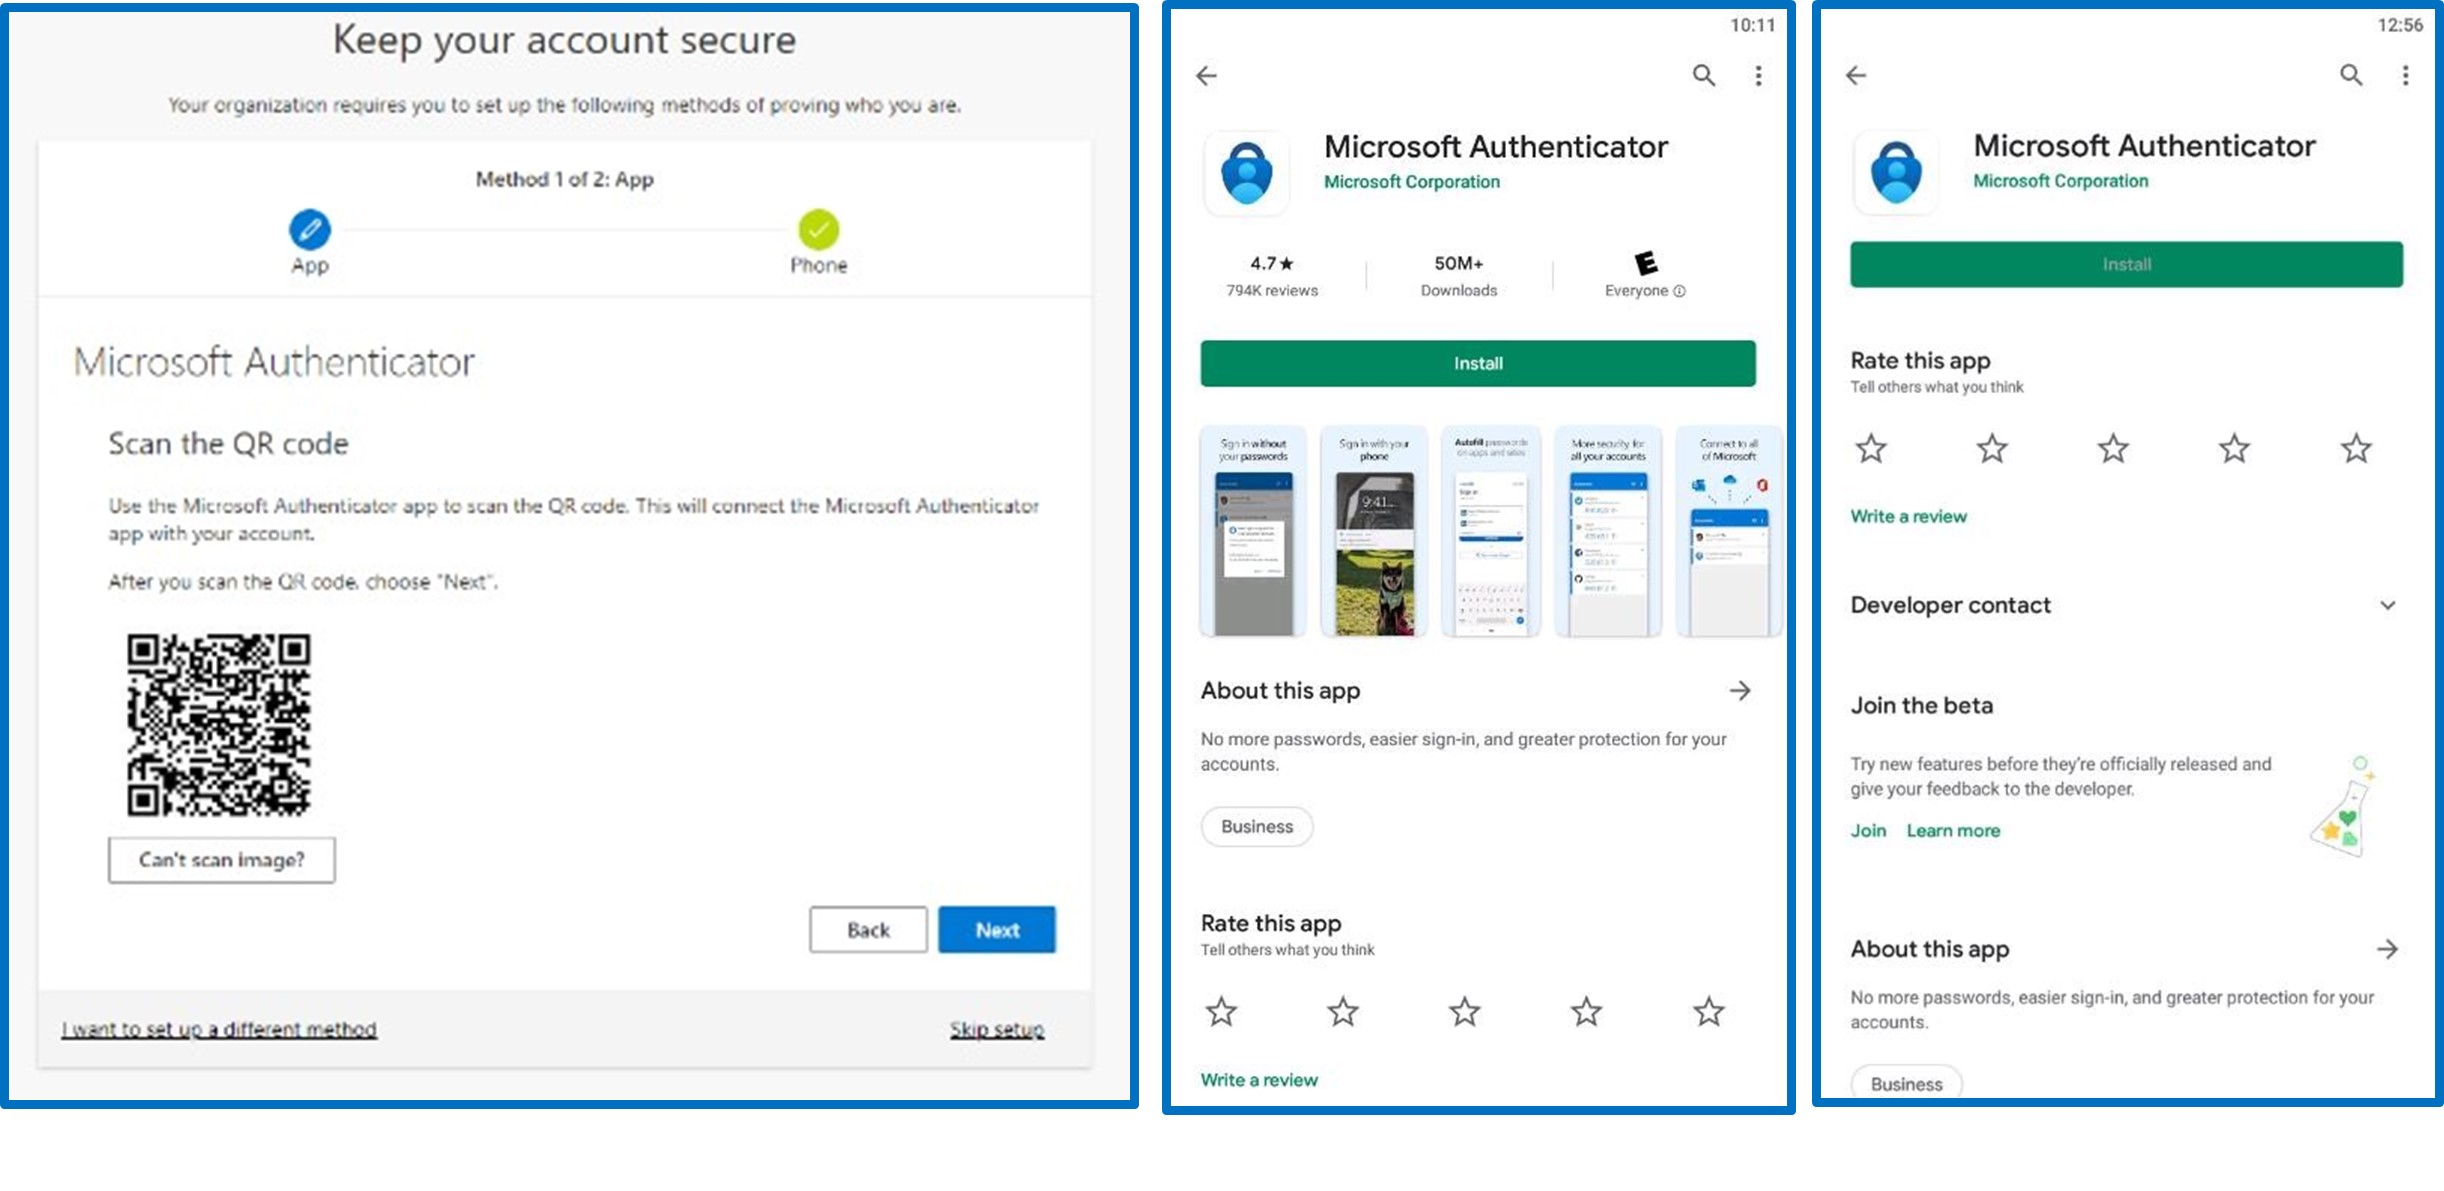
- Install the “Microsoft Authenticator” app from the Google Play Store.
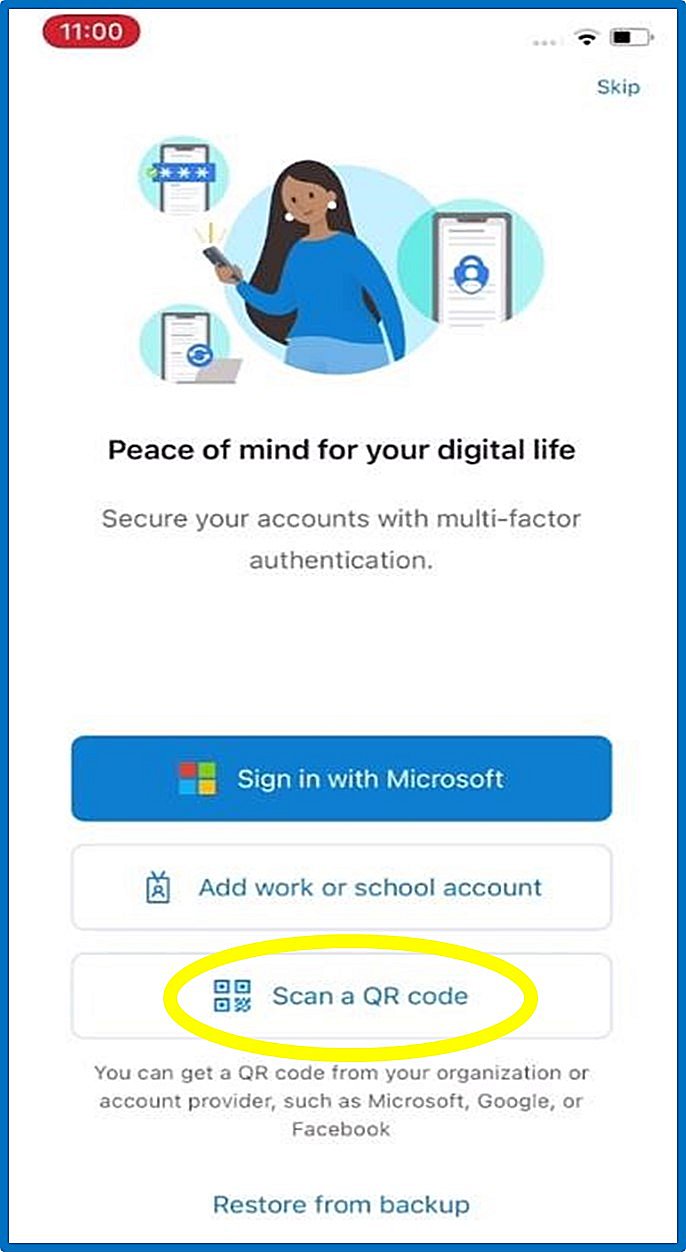
- Open the Microsoft Authenticator App and then select “Scan a QR code”.
Select Allow when asked to “Allow Authenticator to take pictures and record video?”
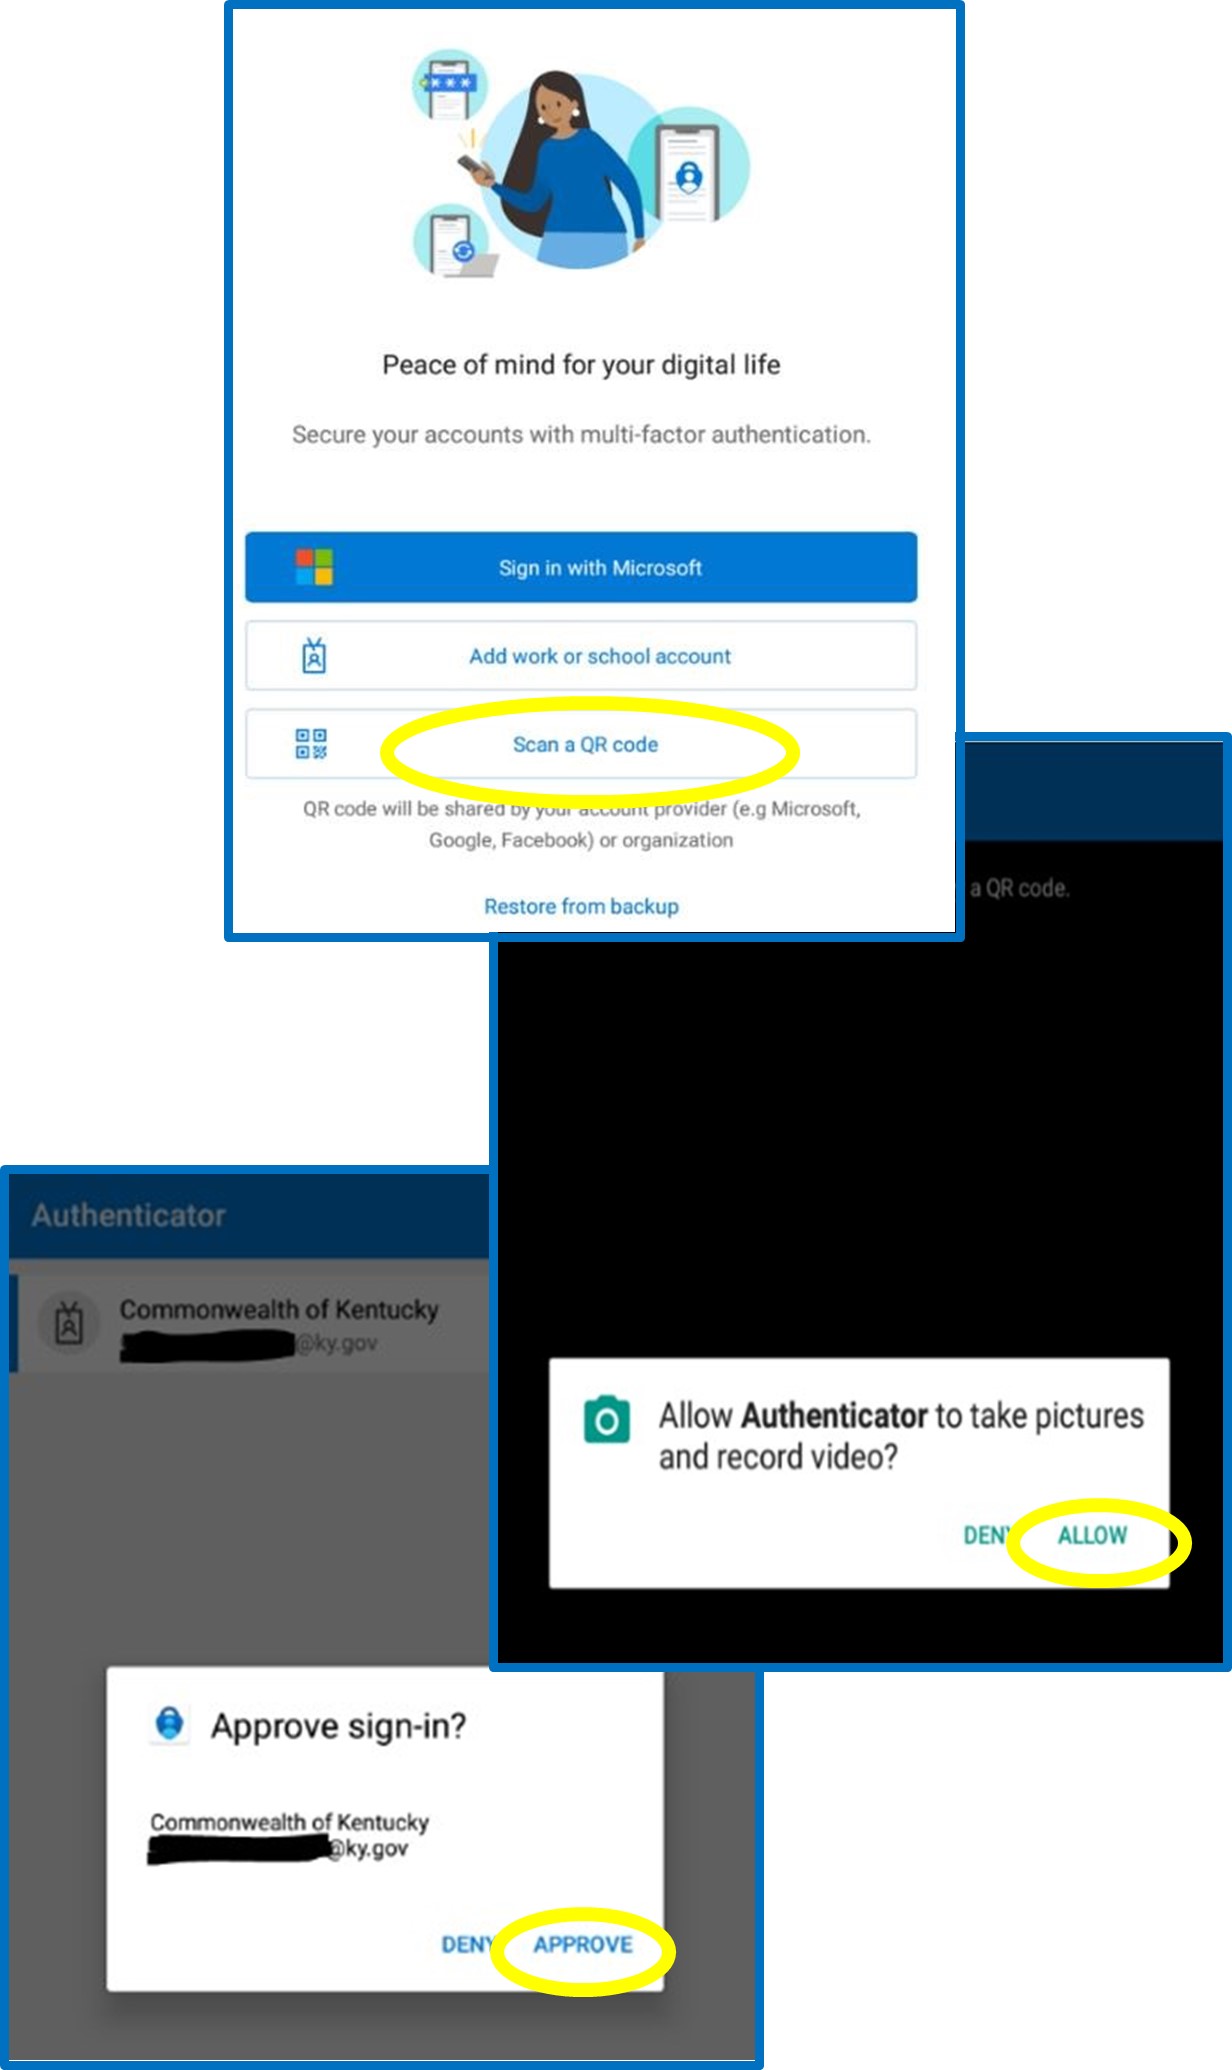
- On your computer click the next button to setup your account. You will be presented a QR code to scan with your phone. Hold your phone up to the screen and
- scan the QR code shown. (See Appendix B if you are unable to scan QR code)
- The Microsoft Authenticator App will say that the account has been successfully added and you will see your account listed in the app.
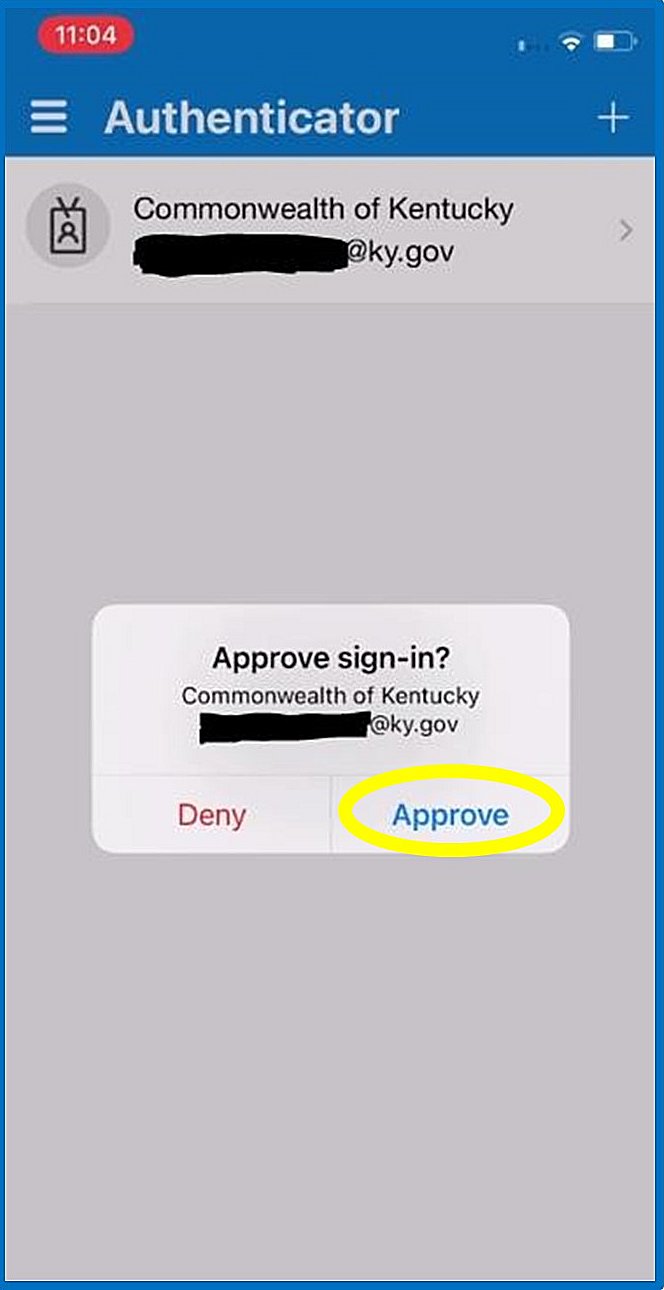
- On your computer, click next to test and verify the application is registered properly. A pop-up message should be displayed on your phone to approve the verification.
Microsoft Authenticator - IOS
- Install the “Microsoft Authenticator” app from the Apple App Store
- Open the Microsoft Authenticator App then select “Scan a QR code”.
- Select OK when asked ““Authenticator” Would like to Access the Camera”.
- Select Allow when asked “”Authenticator” Would like to Send You Notifications”
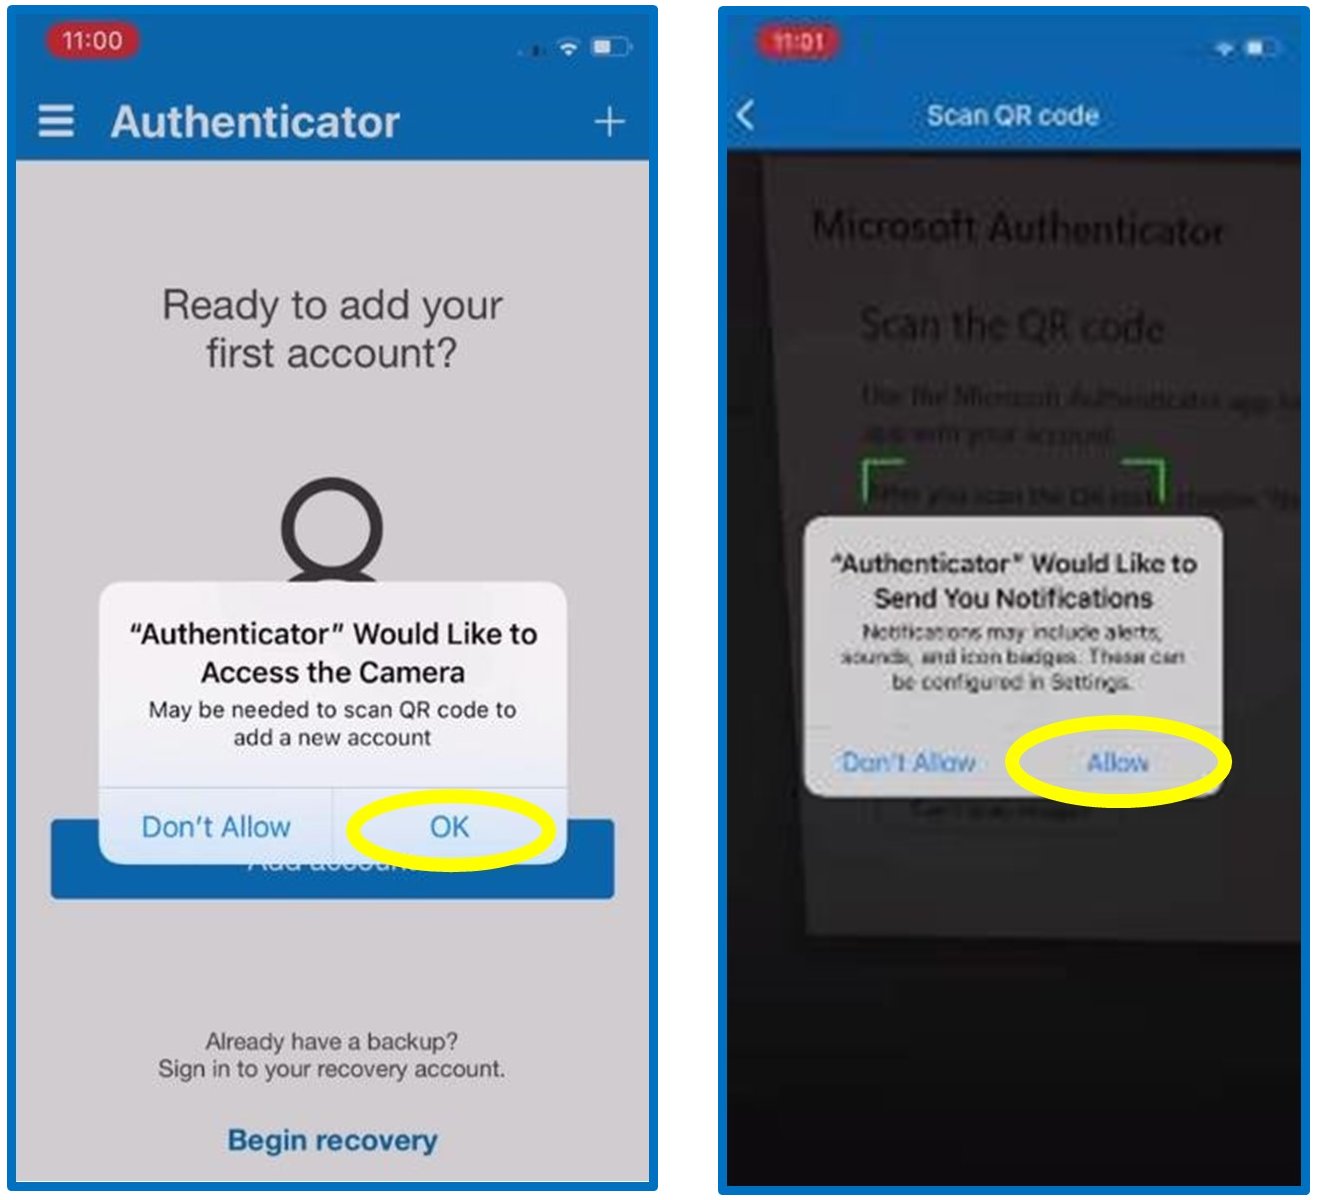
- On your computer click the next button to setup your account. You will be presented a QR code to scan with your phone. Hold your phone up to the screen and scan the QR code shown. (See Appendix B if you are unable to scan QR code)
- The Microsoft Authenticator App will say that the account has been successfully added and you will see your account listed in the app
- On your computer, click next to test and verify the application is registered properly. A pop-up message should be displayed on your phone to approve the verification.
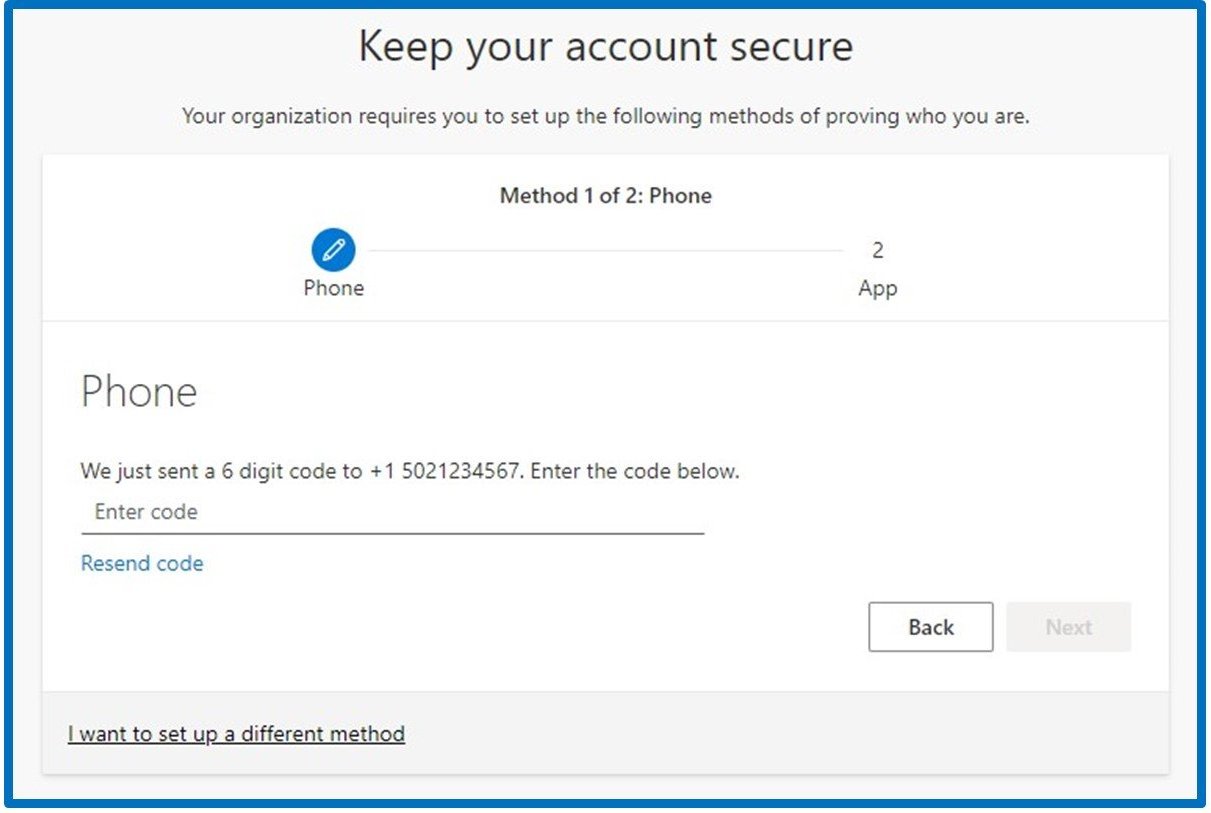
Mobile Phone
- Use the drop down to select the country code and enter your 11-digit phone number.
- Select “Text me a code” or “Call me” and click next.

- If you selected “Call me” you will receive a phone call from Microsoft, you must answer the call and select the “#” key to verify your number. If you selected the “Text me a code” option you will receive a text message containing a 6-digit code, enter this code on your computer and click next to complete the setup.
Office Phone
The Office Phone option may not be available for all users during initial registration. Adding this option along with any alternative phone can be performed from the user’s My Security Info page (See Appendix A)
- Use the drop down to select the country code and enter your 11-digit phone number and an extension if applicable.
- The only option is to “Call me” as an office phone cannot receive text messages.
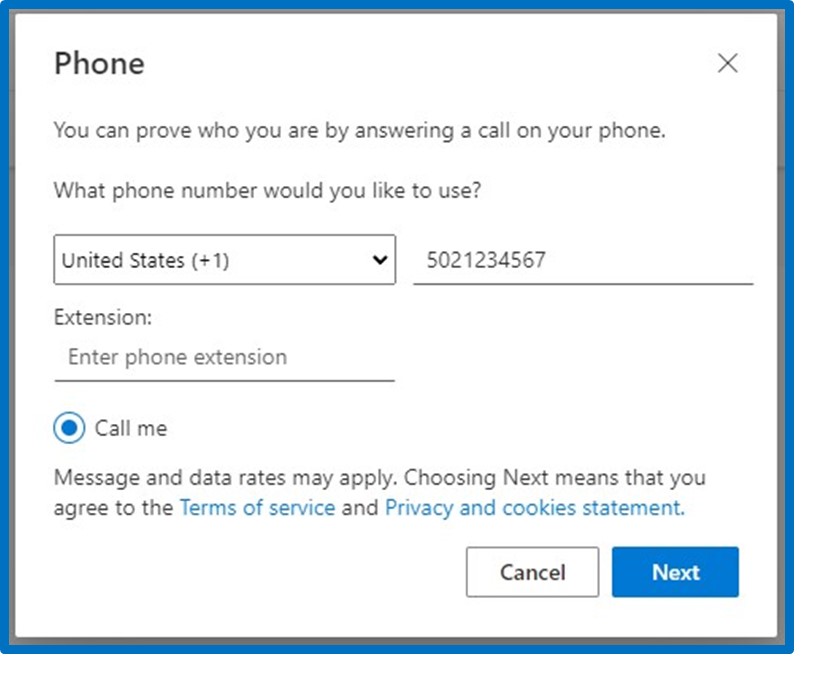
- Click next and your office phone will receive a call from Microsoft, answer the call and follow the instructions to verify your phone.
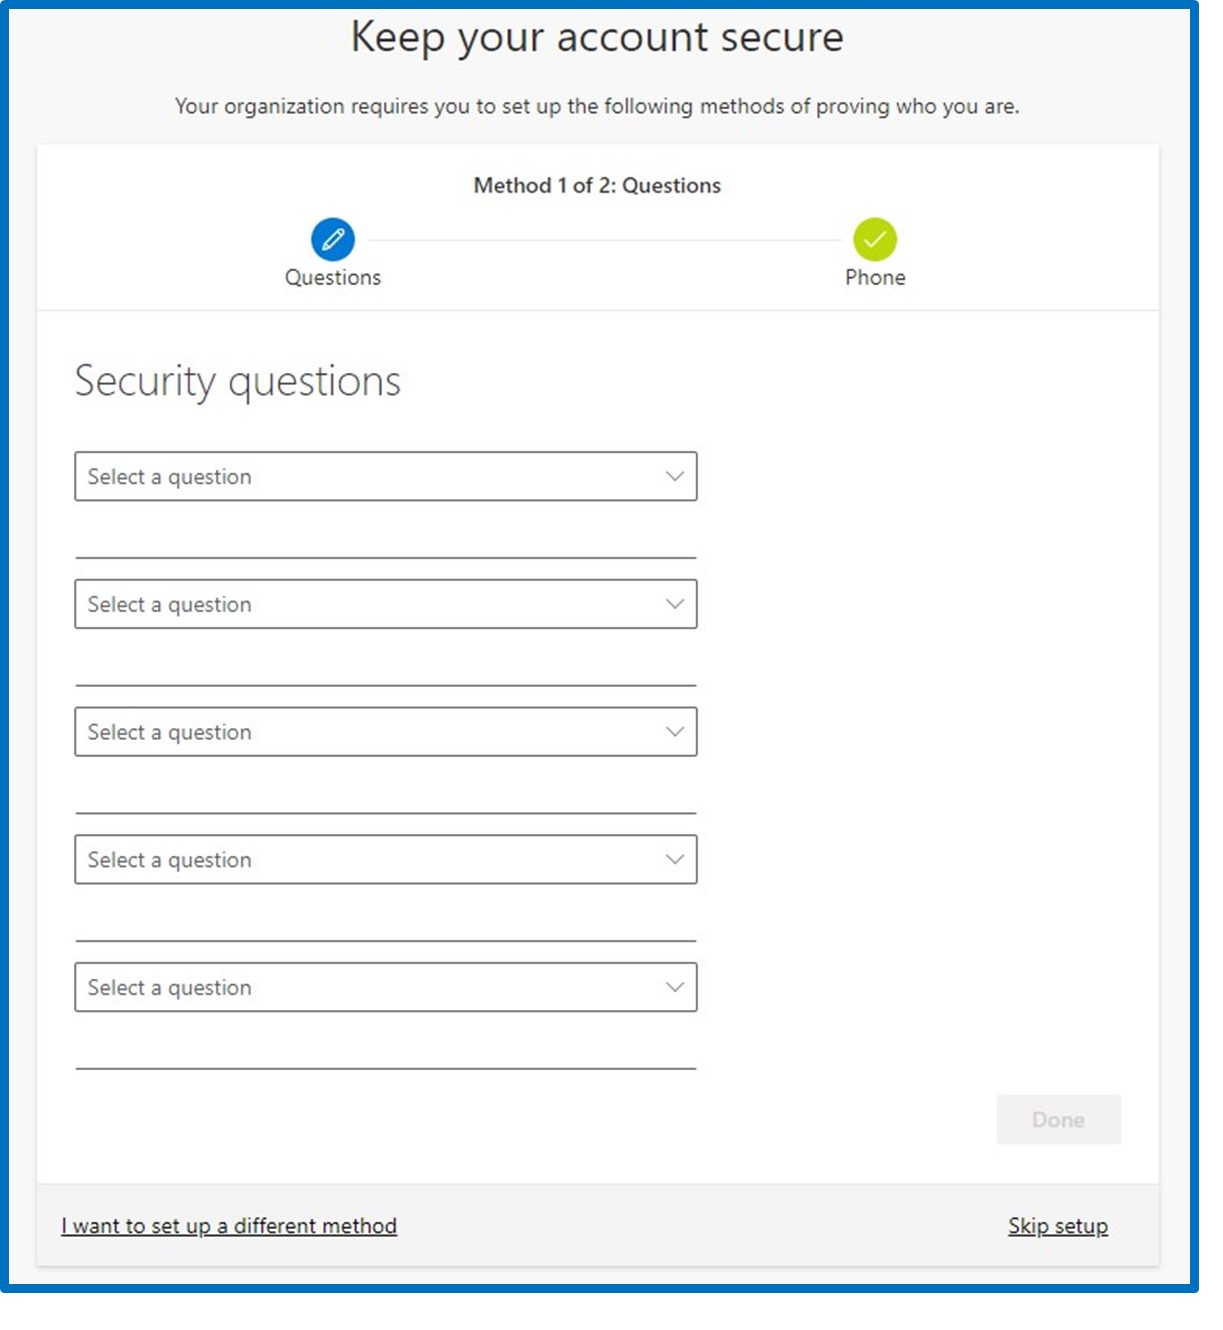
Security Questions
- Security questions can only be used for the Self-Service Password Reset service not for MFA.
- You must answer 5 questions at the time of registration but only three will be required to use the Self-Service Password Reset feature.
- You cannot edit or change inpidual questions after registration. However, you can choose to remove all questions and re-register later if desired. (See Appendix A)
- Use the drop-down box to select each question and provide an answer for each. You cannot use the same answer for more than one question. Answers are not case-sensitive.
Appendix A
Add/Change MFA/SSPR authentication methods
- Users can change their registered authentication methods after initial registration
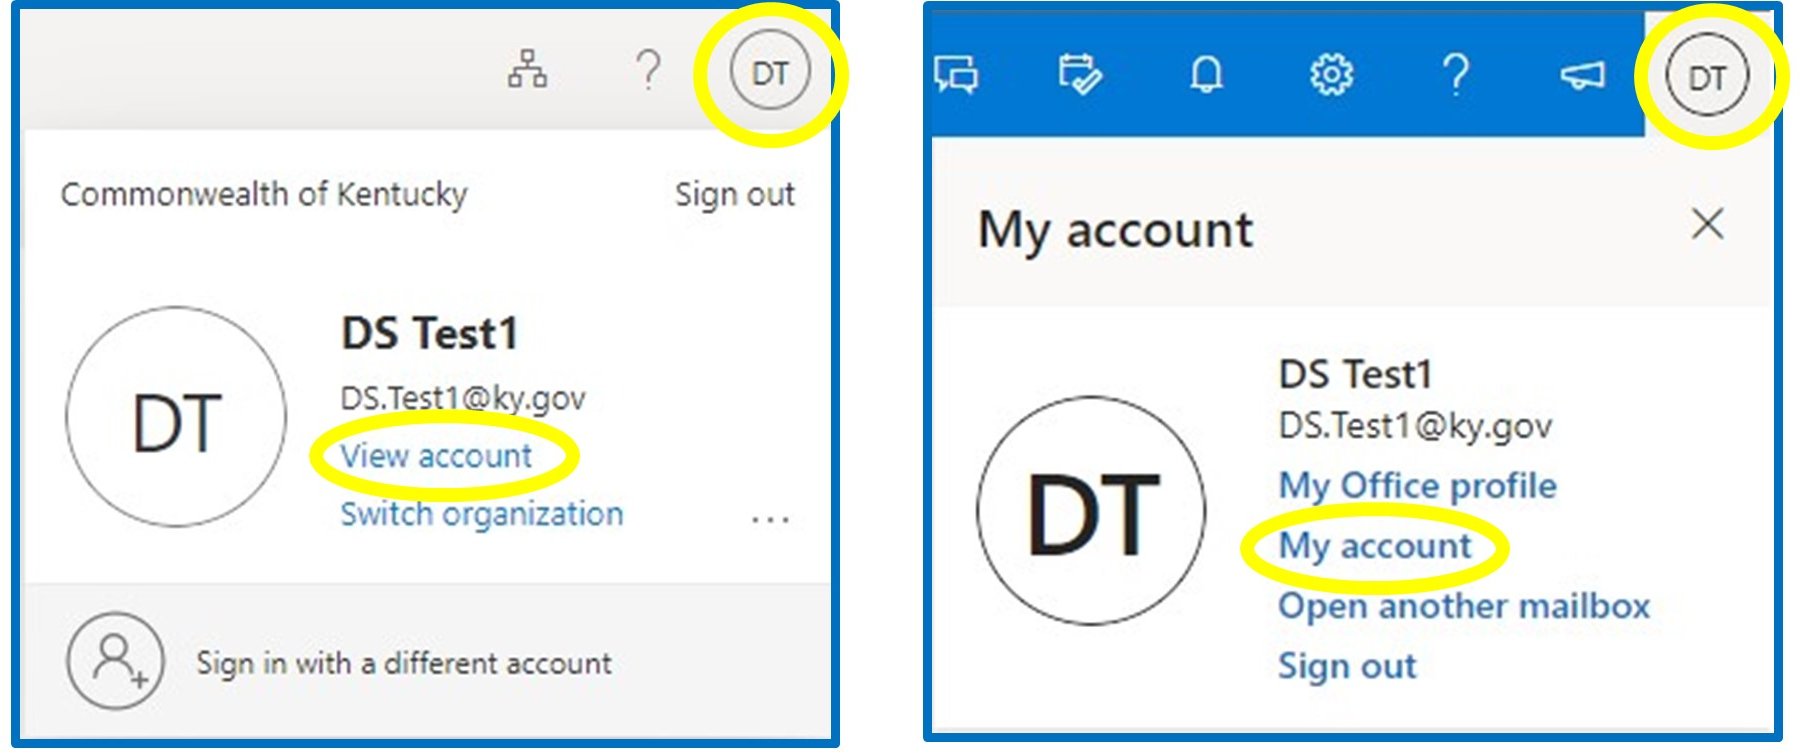
- Use this address to go directly to you settings page: https://aka.ms/mysecurityinfo
- Another option is to access your account settings when you are logged into Azure/Office365. Click on your user in the upper right corner, select “View Account” or “My account” then “Security Info” on the following page.
- Once here, you can delete and add any methods that available to you. You may also change your default sign-in method as well as change phone numbers or delete security questions and add new questions.
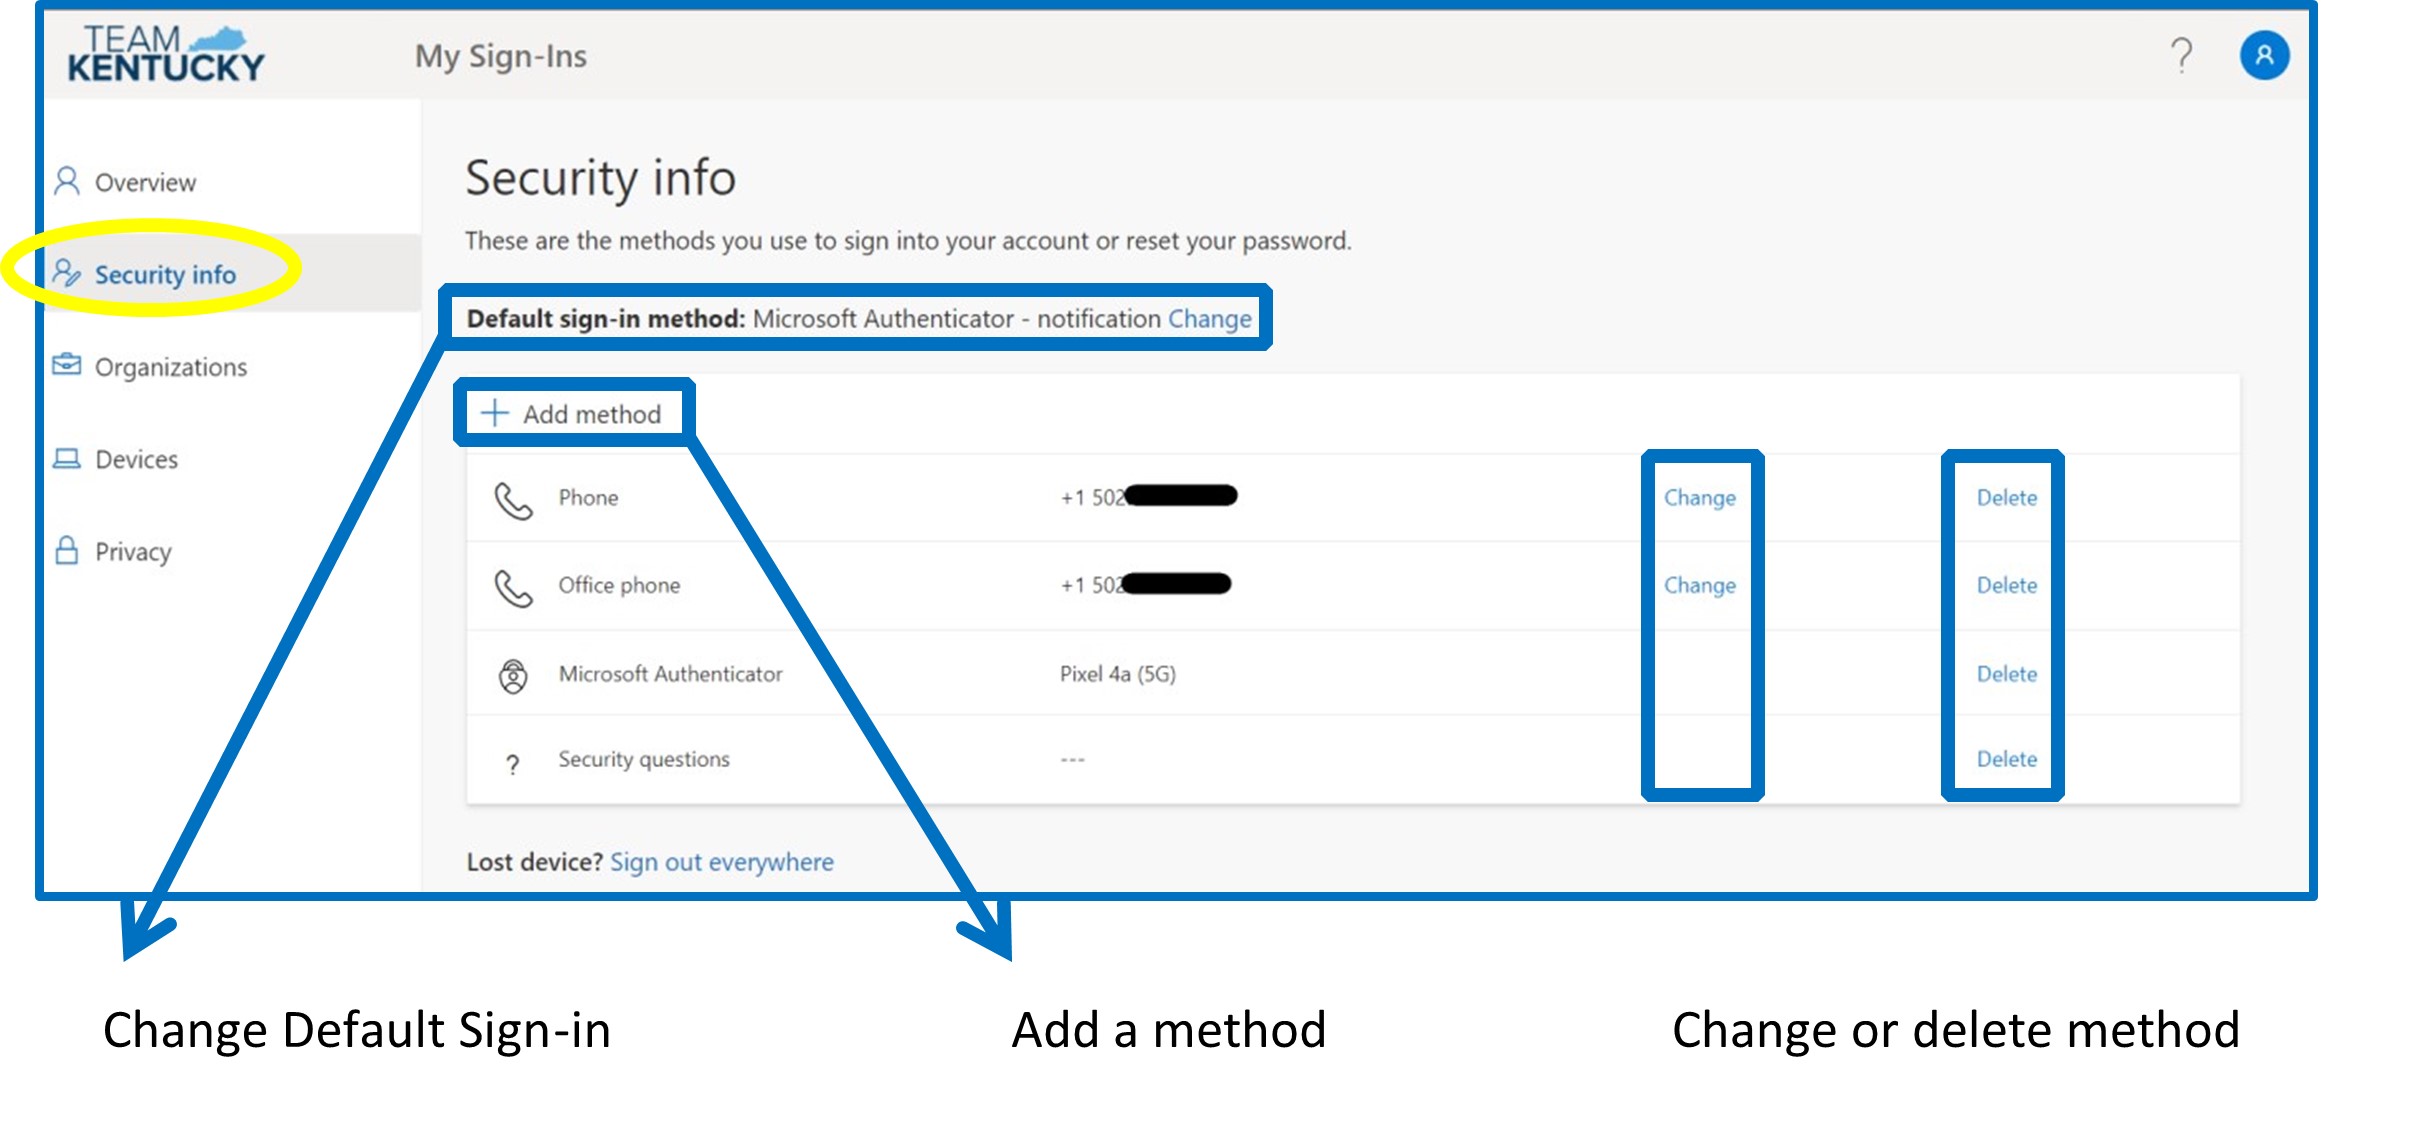
- The same instructions in the registration guide apply to adding any of these methods from here as well.
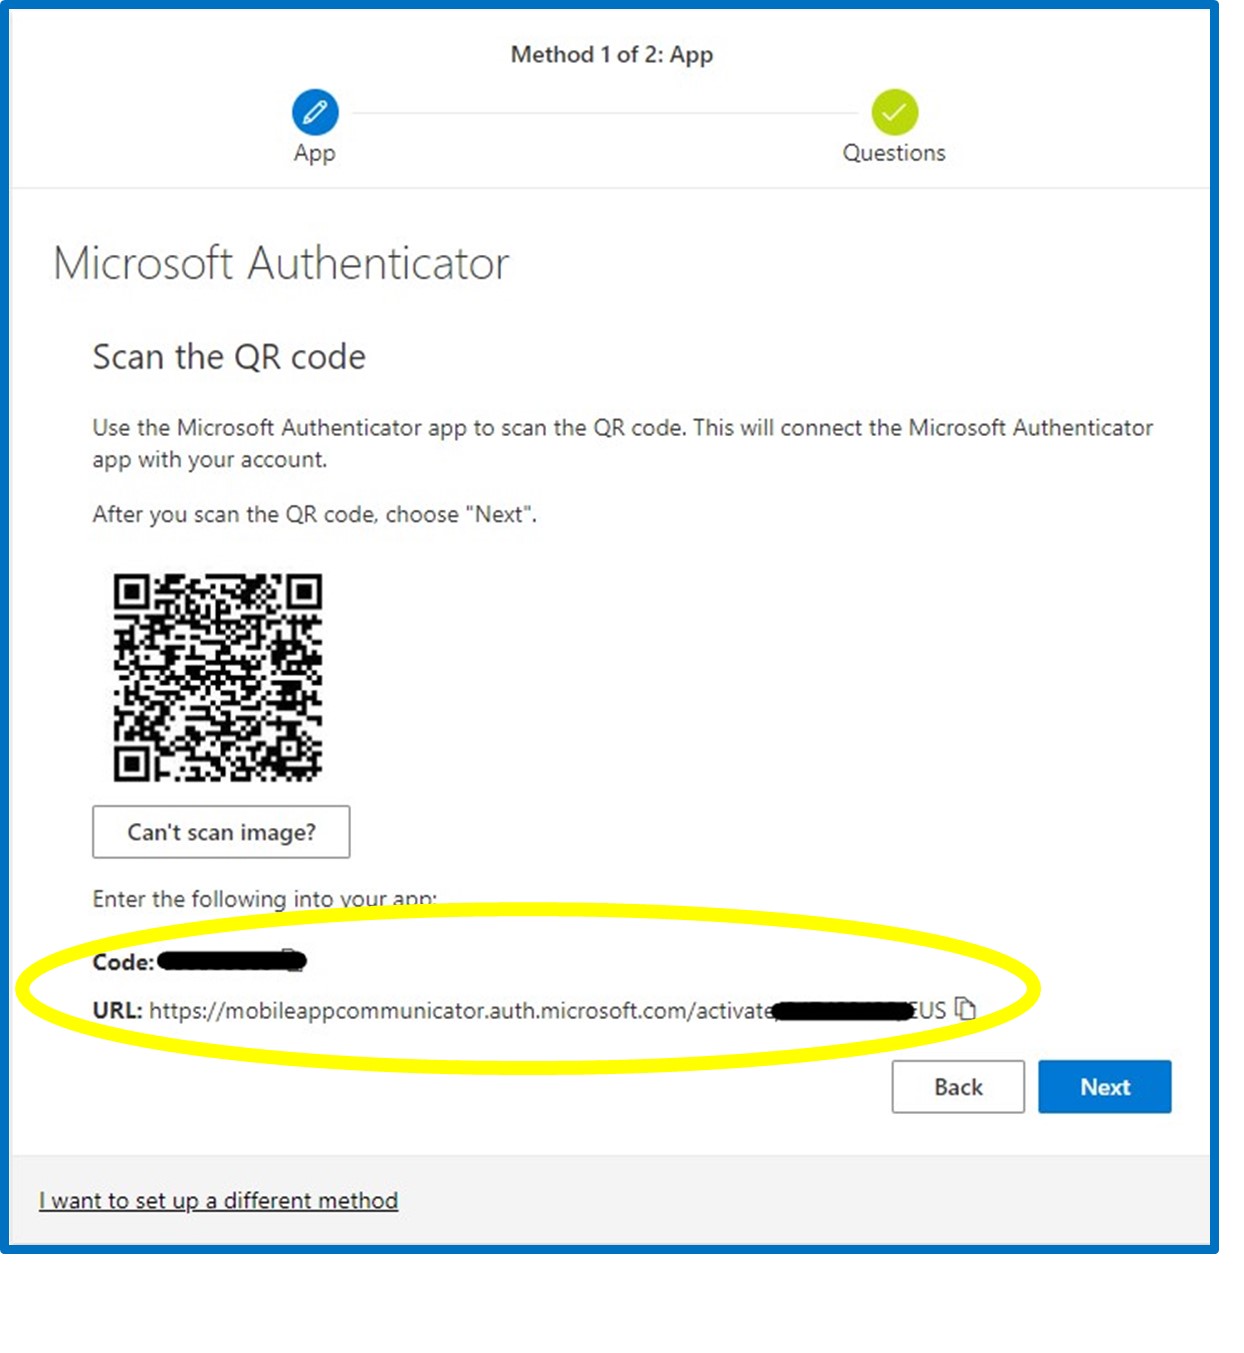
Appendix B
QR code will not scan
- If you cannot scan a QR code when setting up the Microsoft Authenticator App you can register the account manually. Select “Can’t scan image?”
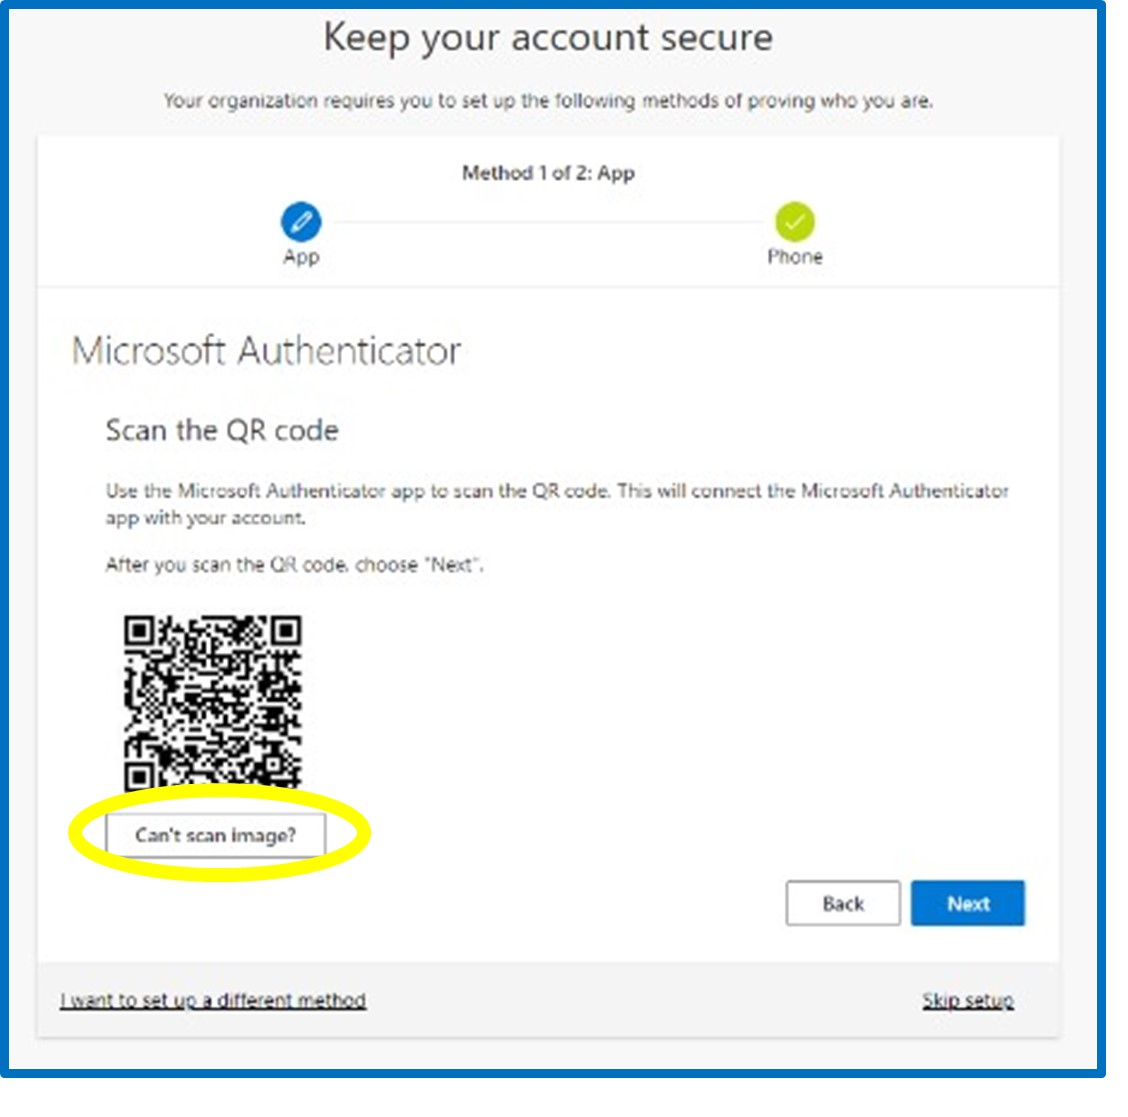
- On the next screen you will be presented with a code and URL to transfer to the Microsoft Authenticator App on your phone.
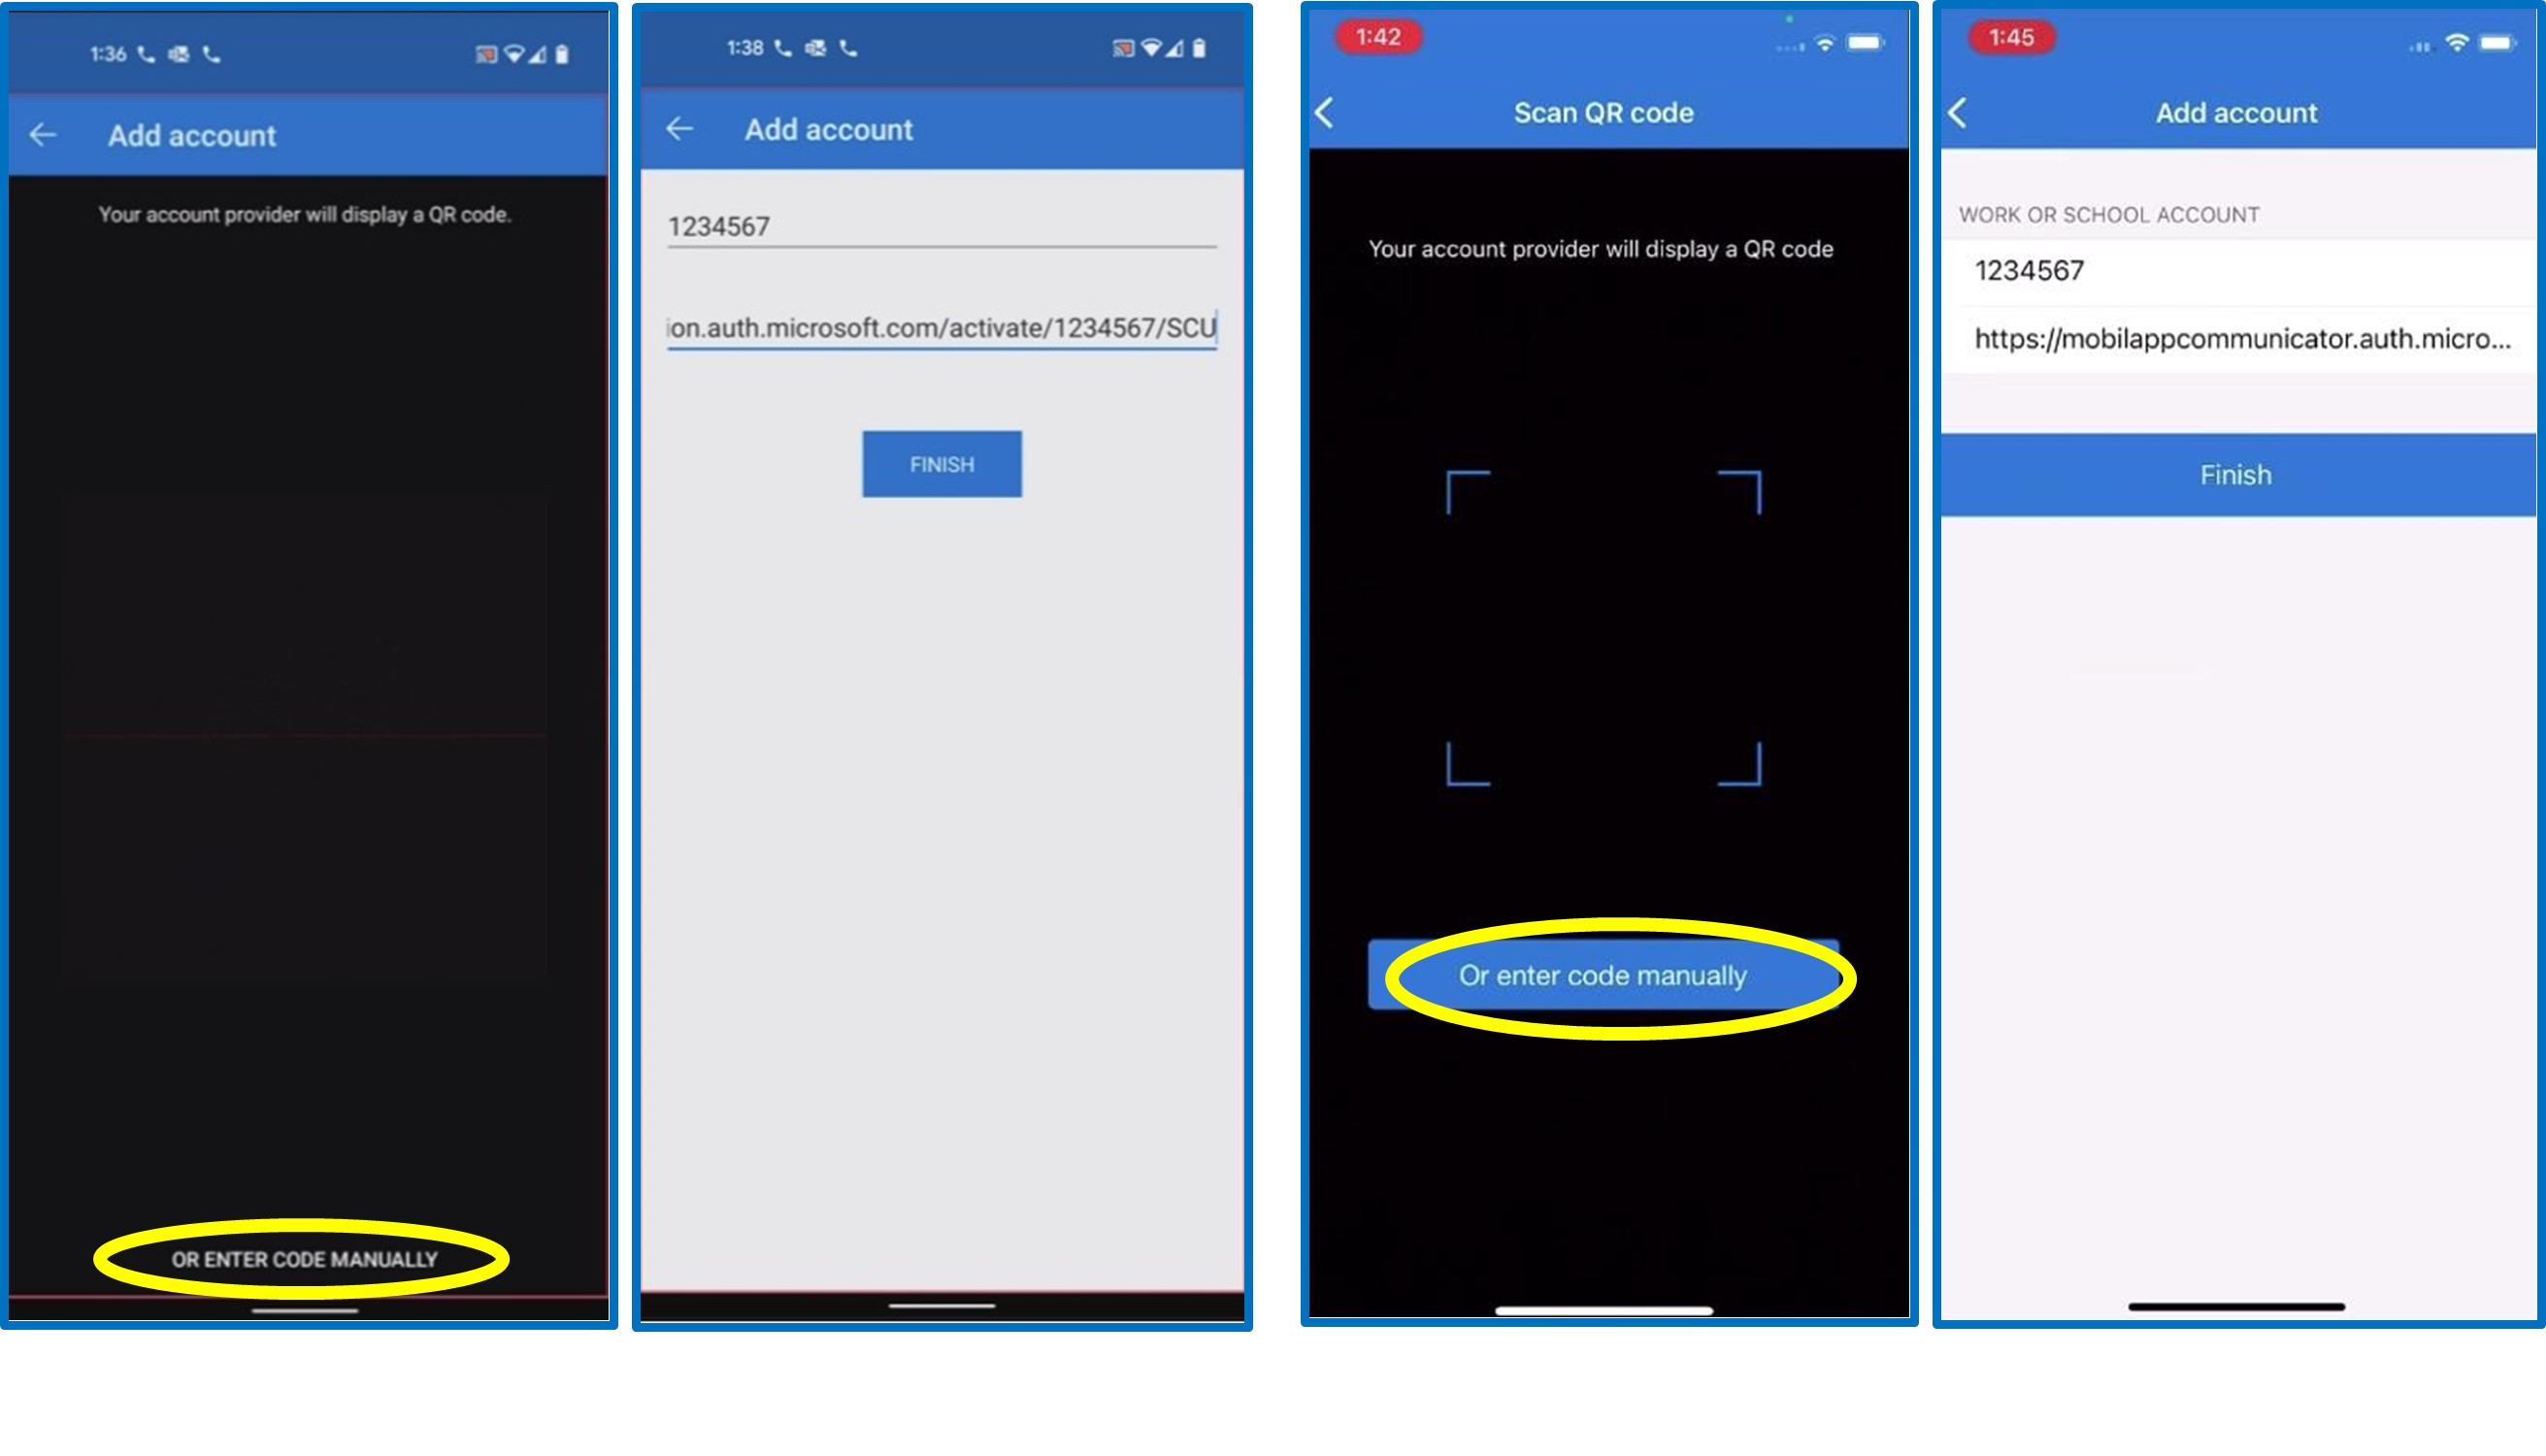
- On your Android or IOS phone at the bottom of the Microsoft Authenticator QR code scan screen you will see an option called “Or enter code manually”. Select this option and enter the code and URL
- Click finish on your phone, click next on the computer, and click approve on your phone to complete the registration.
Appendix C
Third-Party Authenticator
If you do not wish to install and use the Microsoft Authenticator, other third-party options can be used. There are other mobile applications and brands that support generating TOTP codes such as Google Authenticator, Yubico Authenticator, Authy Authenticator, Duo Authenticator, etc.….
We highly encourage you to use the Microsoft Authenticator but if you choose to use another:
- Please ensure it is from a trusted and reputable source.
- You will lose the ability for Push notifications and will be restricted to the use of a 6-digit code only.
- Setup will be very similar to setup for the Microsoft Authenticator. You can either scan a QR code or input the key information manually.
Appendix D
I have previously installed the Microsoft Authenticator
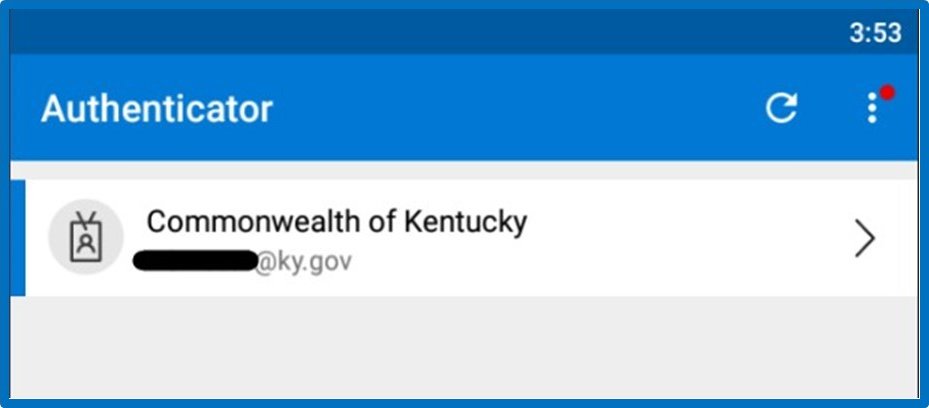
If you have previously installed the Microsoft Authenticator and used an Office365 application likes Teams or Outlook, you may see an account already listed like these:
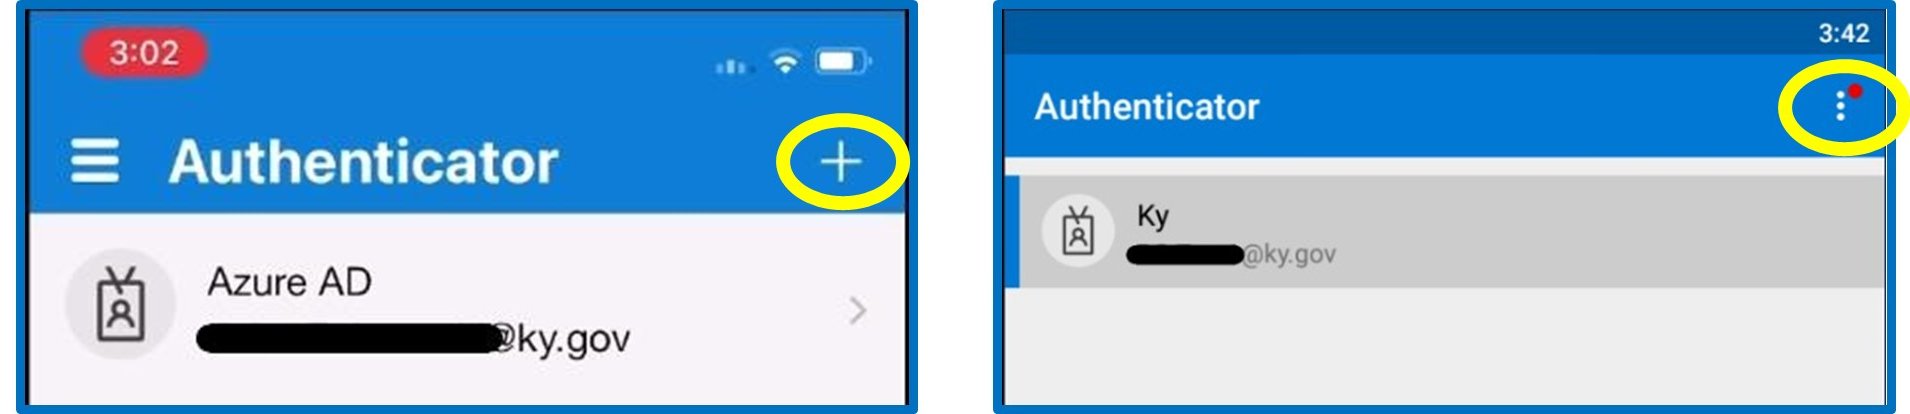
In order to extend the functionality of these to also include MFA and SSPR, you will need to add the account again. By adding the account again, the entry will be replaced with a more functional option.
- You can select the add account option with the + or 3 dots indicated above to add/replace the entry.
- After selecting the add account option you will need to select the “Work or school account” option.
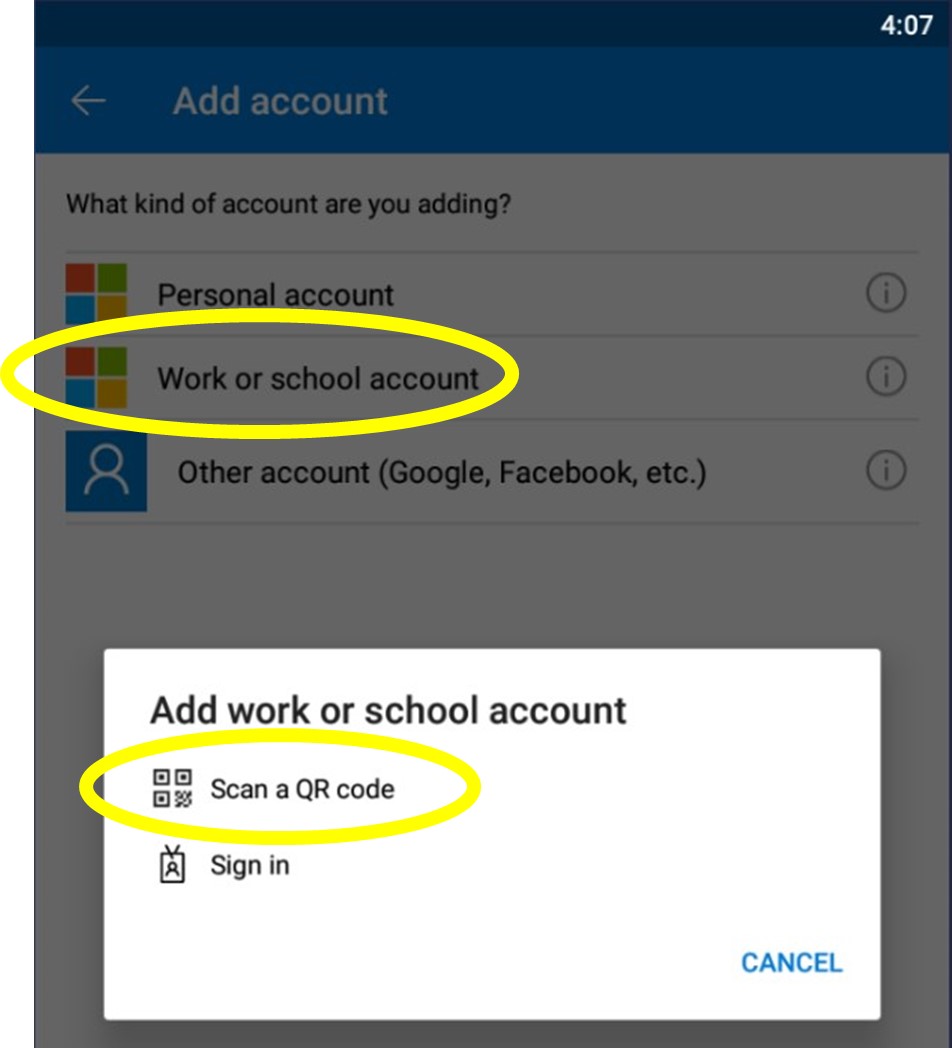
- Proceed to scan the QR code as show in previous instructions.
- Validate the application by confirming the test notification from Microsoft.
Once you have completed the registration you will also notice the name of the entry has been updated to “Commonwealth of Kentucky”. This will indicate that you have successfully upgraded the entry.